Getting started
Sign-up for an account
You can sign-up for a relivedigital subscription at Sign Up
Signing in

To sign in go to relivedigital.com and click on Sign In. You’ll need to enter your email and password. You should have received these in your confirmation email when you subscribed.
Lost password
If you have lost your password just click on Forgot Your Password?
Uploading photos
Go to your ReliveDigital gallery at username.relivedigital.com and sign-in.
Click on Upload.
To Upload photos either:
a. Use the Select Photos button, or
b. Go to your file explorer and drag your photos to the Uploader where it says Drag photos here.

Add the attributes you wish to apply including Album, Tags, Permission and License preferences. If you leave these blank the photos will be uploaded and visible in your Gallery with Permission set to Private and License to All rights reserved.
When you are ready click Start Uploading.
You can also upload a photo through our mobile apps for iPhone and Android. See Apps section for more information.
What file types and sizes can I upload?
You can upload .jpg and .tiff files up to 60MB in size.
Viewing Photos
There are several ways to view photos.
Latest Activity View
Provides a snapshot of the most recently added photos.

Gallery View
The best way to view lots of photos, whether in the gallery, in albums or tagged.
The order of photos in Gallery View can be set to:
a. Sort by date taken or date uploaded
b. Ascending or descending

Lightbox View
View one photos at a time and maximise the photo size for your given screen size.

Detail View
This is where you can view detail and edit or change settings.

Set Display Name and Profile
Set Display Name
Click on ReliveDigital User and enter your display name. This will be reflected in your shares on Facebook, Twitter and email.

Set Profile Photo
Select a photo you wish to use as your Profile Photo then from within Detail View click on Profile Photo in the bottom left hand corner of the Function Menu.

Organising photos
Photo title and description
Changing a photo’s title
Change the photo title by clicking on it and entering your new title.

Change the photo title by clicking on it and entering your new title.
Adding or changing a photo’s description
Click on the description and add or change as you like.

Change other photo details
You can change the following details in the photo\’s Detail View:
a. Photo title
b. Photo description
c. Photo\’s date taken
d. Rotate photo
e. Privacy setting
Albums and tags
Organising photos
Photos can be organised with Albums and Tags.
Albums
Photos can be selected and added to any album. This is an easy way to organise photos. Note that photos do not need to belong to any album and they can belong to any number of albums.
To create a new Album go to Album menu and click on Create an album.
New Albums can also be created in the Upload page.
Tags
Tags are a great way to classify photos. A tag can be any descriptor. For example, you may tag
a photo with the names of people in it, place where it was taken, the event, photographer or
whatever you chose.
The uploader will auotomatically add tags for the year and month the photo is taken in.
The Apps will add a Favourite tag when a user stars any photo as a favourite.
Another handy technique is to tag photos as being *, **, ***, **** or ***** stars.
Selecting multiple photos and batch editing
How do I edit multiple photos at once?
To use Batch Edit, visit your gallery and hover over the photos you want to edit. Click the pushpins of each photo. You can also select all, which will select all the visible photos. Then select Batch Edit and edit away.
How does Batch Edit work?
Batch Edit lets you edit multiple photos at once. You can:
a. Add or remove all selected photos from albums.
b. Add or remove tags from all selected photos.
c. Change the date.
d. Change the privacy settings.
e. Delete the selected photos.

How else can I select a photo for batch editing?
You can click a photo while holding the Alt key to select it. If you want to select a range of photos to edit, click the first photo while holding the Shift key. Then click the last photo while holding Shift.
Are there any other shortcuts I should know about?
Yes. Press ? on your ReliveDigital gallery to bring up a full list.
Public and private settings
Public and Private Settings
You have the option to set your photos to be Public or Private:
Public photos are visible to anyone by simply going to
username.relivedigital.com. Please note that a Public photo’s metadata, tags and other details will also be visible to the public.
Private photos are only available after signing in with your password.
Any photos that are uploaded are set to private by default. You can change this when uploading by selecting Public. You can also change your privacy setting by:
a. Clicking on the padlock icon on any image.
b. Using the batch edit feature
Sharing photos
Sharing photos and albums
Sharing photos and albums is as easy as clicking on the share icon .
You can share via email, Twitter, Facebook or by embedding some code in your blog.
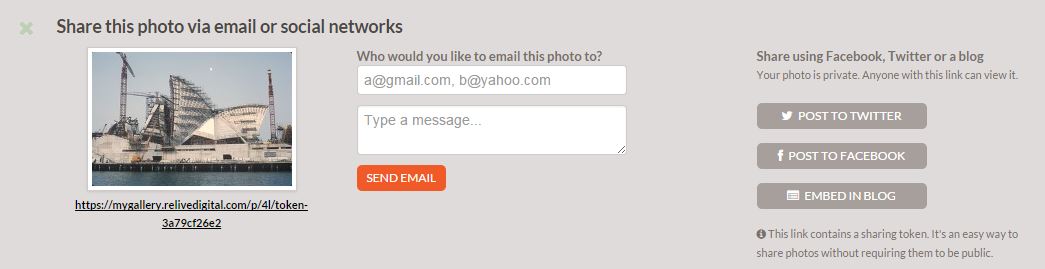
When you share a private photo or album, a sharing token is added to the photo link
(see the code after “token-” in the image above). This is like a key and
private photos or albums will become accessible to anyone in possession of this link.
This is a much simpler way of sharing private materials than requiring a sign-in and password.
Remember, anyone with the sharing URL will be able to see the photos or albums!
Sharing Photos on Facebook
Sharing Photos on Facebook
To share on Facebook simply click on Post to Facebook and you will be logged into your Facebook account.
As with all posts to Facebook, anything you share will be available to all the members
of the group you chose to share with. If you share with public, everyone will have access.
If you share with friends, all your friends will have access, and so on.

Sharing Albums on Facebook
Sharing an Album on Facebook works the same way as with photos. Just click on
Post to Facebook, add a comment and select who to share with. The photo displayed
on Facebook will be the first photo in your Album.

Sharing on Twitter
To share photos or albums on Twitter click on the share icon .
Then click on Post to Twitter and fill in the fields. That’s it!

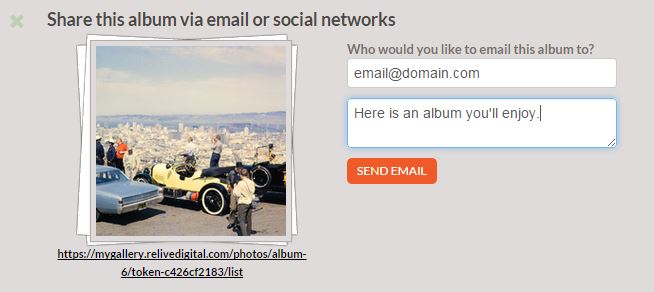
Sharing by email
To share photos or albums by email click on the share icon .
Add an email address and comment and hit Send Email. An email will be sent with
the sharing link.
Embedding in a blog
To embed a photo into a blog, click on Embed in Blog and copy all the text that appears below.
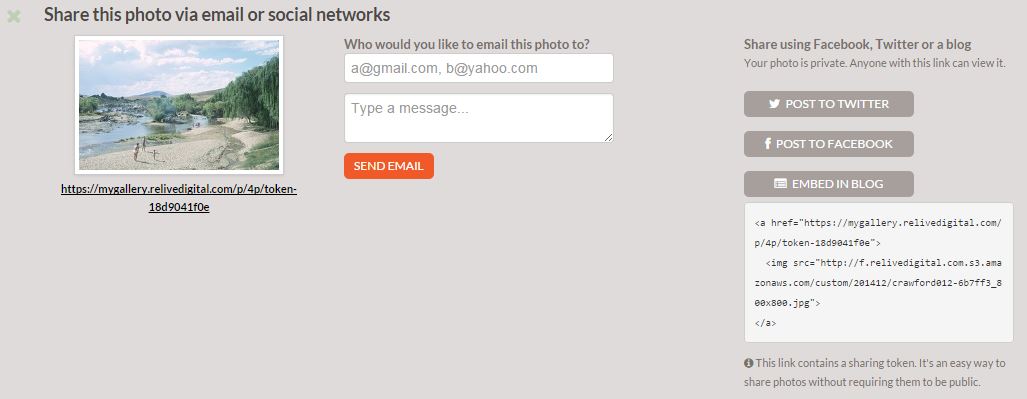
You can only embed photos, not albums.
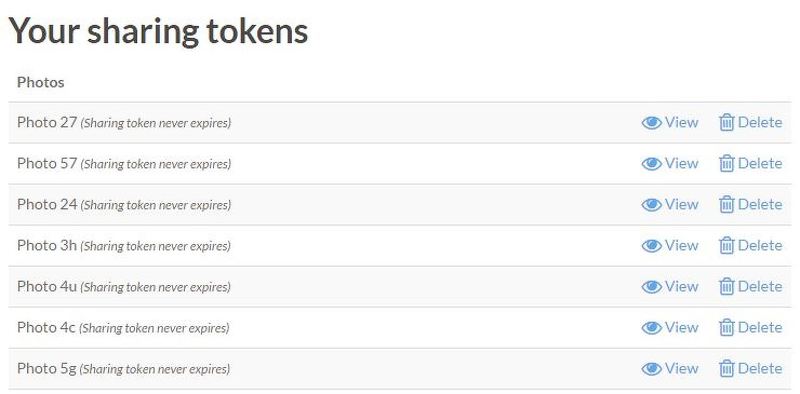
Revoking a sharing link
If you wish to cancel a sharing link you can easily do so by revoking it as follows:

a. Go to Settings
b. Look through your sharing tokens.
c. Delete the tokens you wish to revoke.
Once revoked the link will no longer work.
Privacy and security
Passwords
When setting a password for your account please ensure it is strong.
Do not use easy to remember passwords that contain proper names, place names or birthdays.
Strong passwords should contain a mix of upper and lover case letters, numbers and other characters such as $%#@*(). A combination of the above will maximise the strength of your password and the security of your site.
If you loose your password or wish to change it, click on: Forgot Your Password?
To change your password go to: "Change Password" option on My Account
SSL certificates
Privacy and security are a key priority and all ReliveDigital gallery and website pages are secured with using an SSL certificate. This means all data transmitted to or from your computer or mobile devices is encrypted and secure.